As the seasons change, many of us are motivated to tackle projects like cleaning out and organizing closets, the pantry, refrigerator, and even your sock drawer may get a makeover.
Your make-up kit needs a regular clean out, too. Over time, make-up, brushes and applicators can become contaminated with bacteria that may lead to irritation and infections.
So how do you know when it’s time to throw out your make-up?
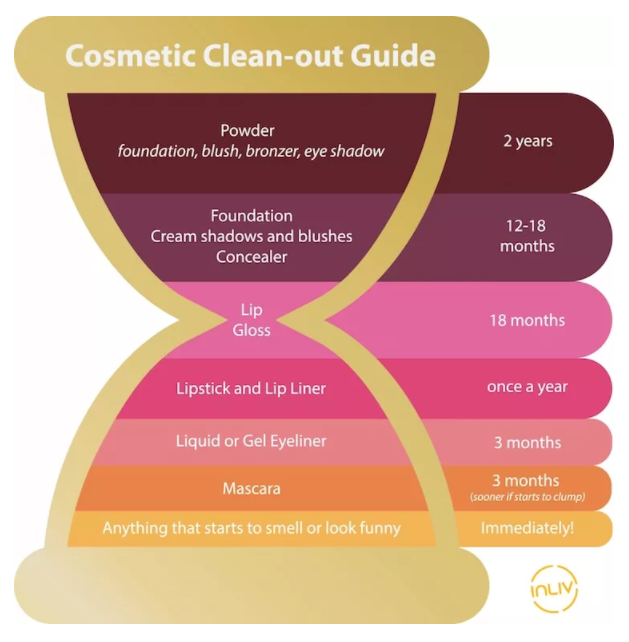
“My rule of thumb is to discard most make-up products one year after opening,” says Dr. Wendy Smeltzer, previous Medical Director for INLIV and the Medical Aesthetics Department. “Except when it comes to mascara, and liquid and gel eyeliners. Anything you’re applying that close to your eye, you want to be very careful to avoid the risk of eye infections.
Mascara goes bad in a very short amount of time because each time you use it, you pump air into the tube. This dries it out, creating those clumps that ruin the application. Toss it out as soon as it starts to clump; it’s not going to get better from there. The instant mascara or anything in your make-up kit smells weird or looks “off” – toss it immediately!
Here are some general guidelines when you’re evaluating your make-up stash:

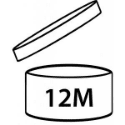
Most make-up labels also have a Period After Opening (PAO) symbol – it’s the tiny open jar with a figure indicating how many months the product will last after being opened for the first time.

While lipstick can last about a year, you may want to disinfect it if you’ve been sick. Some people like to clean the outside of the container with a disinfectant wipe, clean the inside of the cap with a cotton swab dipped in rubbing alcohol, then tuck the tube in the freezer for a few hours to help kill off any germs. Remember to let it warm up again before trying to apply it. However, don’t try this with lip gloss as freezing it may change the composition completely.
Others advocate dipping a tube of lipstick into isopropyl alcohol for 30 seconds to clean it. If you try, this be sure to let it dry completely before using it.
Wondering how to track when it’s time to replace your make-up? Try the BeautyKeeper app! It’s free and simple to use.
Cleaning your make-up brushes and applicators.
Now that you’ve cleaned out your old make-up, let’s take a look at your makeup brushes and sponges.
Brush hairs and sponges are porous so they hold onto oils, debris, and bacteria. Being prone to acne, Allie is acutely aware that our skin produces oil and further contaminates our make-up and application tools. When we continue to use these tools, we spread the oils and germs back to our faces – causing acne and breakouts.
It’s recommended you clean your make-up brushes each week, but I think we can all agree it’s unlikely that will happen! I suggests aiming for a minimum of once a month, and more often during hot weather.
Cleaning your brushes doesn’t have to be an onerous task. We sell Jane Iredale Botanical Brush Cleaner, which I love! Just spritz some of the cleaner onto the brush and gently run your brushes back and forth onto a tissue, removing excess make-up. While doing this it is important to be gentle. Shape the bristles with the tissue, and stand your brushes upright in a cup so they can dry naturally.
You can also wash your brushes using a gentle shampoo; baby shampoo works well. Ensure you rinse them well and handle the brushes and bristles gently to help preserve them.
If you’re using drug store make-up brushes, they may not hold up as well when you clean them. And that’s just one of the reasons I strongly recommend using good, quality brushes. They cost more but they’ll last longer and you’ll also notice a difference in how smoothly they apply your make-up. Plus using the right brush for the job is important!
Some of our favorite make-up brushes are:
The Handi – This is a great brush to apply powder foundation. They also offer a retractable one that’s ideal to keep in your purse for powder touch-ups on the go!
Blending Brush – A real workhorse for a make-up brush, as it can be used for both cream based and powder based products on the cheeks, forehead, nose, chin, neck and décolleté.
Flocked Sponge – Okay, technically not a brush but this sponge works wonders at building pigment and keeping your hands clean. I like to use it with my liquid foundations when I want heavier coverage. Apply one layer of your base foundation, let it dry for a few minutes and then apply second layer. You’ll find it’s easy to get smooth, uniform coverage.
Angle Liner Brush – The devil may be in the details and that’s where this brush excels! Use it to apply liner to the upper lids, corner shadows, touching up eyebrows, and even adding a pop of color along the lower lash line. The angle of the brush allows you to apply with precision. No more getting product where it’s not wanted!
Deluxe Shader – This is my must brush for applying any eye shadow. It is soft and gentle, but still holds its shape well. Use light strokes to apply a softer look. For a bolder, higher pigment look, dab the colour on for more intensity.
Sculpting Brush or Crease Brush – A well qualified worker for blending eye shadow to avoid any harsh lines.
Camouflage Brush – This one works well to cover up those tricky spots like dark under eye circles and breakouts, but is only suitable for use with cream based products.
Wondering what products, colours and tools may be right for you, or just looking to change up your look? I’m here to help! Give me a call at 403.648.2137 to schedule a time to come in.
Originally from Calgary, Roxanne has over 10 years experience in the medical field with a medical administrative diploma and over 20 years working in customer service. Roxanne brings a warm, caring and professional touch to our medical aesthetics division and challenges herself on a daily basis to bring a superb level of customer service to INLIV.

Roxanne Evans
Medical Aesthetics Coordinator


